Now that I've become more accustomed to using Maya, I've managed to make the first few seconds of my animation. There was a lot of fiddling with the graph editor and it still isn't perfect, but I now feel a lot more confident to continue.
Wednesday, 26 February 2014
Progress is being made
Now that I've become more accustomed to using Maya, I've managed to make the first few seconds of my animation. There was a lot of fiddling with the graph editor and it still isn't perfect, but I now feel a lot more confident to continue.

Monday, 24 February 2014
Importance of FK and IK
Since I started learning about 3D animation, I've always been aware that FK and IK handles are very important.
IK handles basically mean that the point will stay where it is and everything will move around it, an example being a foot on the ground; you don't want it to move about as the character tilts forward.
FK handles are good for when you want a point to move around freely, such a waving arm.
My problem was that without thinking about it, I decided to suddenly switch from FK to IK handles on the character's hand when he rested it on a door. This resulted in horrible in-between frames when I flattened the tangents in the graph editor.

I'm currently looking into smoothing out the animation with built-in Maya tools, but I will most likely have to re-do all of the hand animations I've done thus far.
IK handles basically mean that the point will stay where it is and everything will move around it, an example being a foot on the ground; you don't want it to move about as the character tilts forward.
FK handles are good for when you want a point to move around freely, such a waving arm.
My problem was that without thinking about it, I decided to suddenly switch from FK to IK handles on the character's hand when he rested it on a door. This resulted in horrible in-between frames when I flattened the tangents in the graph editor.
I'm currently looking into smoothing out the animation with built-in Maya tools, but I will most likely have to re-do all of the hand animations I've done thus far.
Slow progress in the following month
For the following month (until the end of March) progress on my dissertation piece will be slow, and this is mainly due to my focus being shifted to the project that I'm completing for the Ipswich Museum. It may turn out that we finish the project sooner than expected and I can focus on my dissertation, but I'm making this post as a worst-case scenario.
Note that although progress on the dissertation will be slow, it will not be halted. I am still trying to dedicate a few days a week to it, but I'm coming into constant problems that are slowing me down further which I will elaborate on in future posts.
Wednesday, 19 February 2014
Encountered a problem in Maya
Yesterday afternoon I spent an hour doing careful animation to my character, trying to get the subtle movements perfect as he pushes a door open and leans around. Everything was going perfectly well when suddenly, this happened:

The previous hour of work had been completely overrun by shapes like this, and there was no recovering them.
After looking online, I found that the problem was that I was editing the joints of the rig as well as the curves by mistake, something which makes this particular rig break completely. After this happened, I decided to keep two basic rules in mind whilst I animate:
The previous hour of work had been completely overrun by shapes like this, and there was no recovering them.
After looking online, I found that the problem was that I was editing the joints of the rig as well as the curves by mistake, something which makes this particular rig break completely. After this happened, I decided to keep two basic rules in mind whilst I animate:
- Only show the curves and polygons in the view finder
- Always save the file as I go along
Thursday, 6 February 2014
Setting up the scene
In order to set up my scene, ready for part 1 of my animation, I had to watch a couple of tutorial videos. First of all, I had to learn about modelling in Autodesk Maya, as I hadn't considered it as being a challenge when I initially started the project. It turns out that modelling in Maya is actually quite different to modelling in 3DS Max, as the tools and menus are entirely different for it. However, after learning where all of the tools are located, I found it fairly easy to set up a small room with a door.

I also had to learn some finer details about using the Eleven rig, which is where this YouTube video came in very handy. If I hadn't taken the time to watch it, I would have been animating a lot slower throughout my the project.

I also had to learn some finer details about using the Eleven rig, which is where this YouTube video came in very handy. If I hadn't taken the time to watch it, I would have been animating a lot slower throughout my the project.
Thursday, 30 January 2014
Storyboard Part 1
This is the storyboard for the first 30 seconds of my animation. It's done very roughly in Flash, but it demonstrates the different camera angles I want to use and the general flow of the animation. In the first part, the character appears as quite confidant in his quest to steal the Golden Potato from the Giant's house, which will all change in the second part.
Monday, 20 January 2014
Dissertation Timetable
As you can see from the timetable below, I have left 10 days at the end so that if anything takes longer than expected, I can overrun a little. I also predict that the animation smoothing won't take as long as predicted.
Date
|
Task
|
|
Pre-Production
|
20th Jan – 24th Jan
|
Write script for animation
|
GAMES JAM
|
25th Jan – 26th Jan
|
|
27th Jan – 3rd Feb
|
Draw storyboard from script
|
|
Production 1
|
4th Febuary
|
Create ‘Part 1’ geometry
|
5th Feb - 9th Feb
|
Create ‘Part 1’ layout
|
|
10th Feb – 15th Feb
|
Block out ‘Part 1’ animation
|
|
16th Feb – 27th Feb
|
Smooth out ‘Part 1’ animation
|
|
28th Feb – 2nd Mar
|
Set up cameras for ‘Part 1’ animation
|
|
3rd March
|
Set up lighting for ‘Part 1’ animation
|
|
4th March
|
Export ‘Part 1’ animation as PNG Image Sequence
|
|
Production 2
|
5th March
|
Create ‘Part 2’ geometry
|
6th Mar – 10th Mar
|
Create ‘Part 2’ layout
|
|
11th Mar – 16th Mar
|
Block out ‘Part 2’ animation
|
|
17th Mar – 28th Mar
|
Smooth out ‘Part 2’ animation
|
|
29th Mar – 31st Mar
|
Set up cameras for ‘Part 2’ animation
|
|
1st April
|
Set up lighting for ‘Part 2’ animation
|
|
2nd April
|
Export ‘Part 2’ animation as PNG Image Sequence
|
|
Production 3
|
3rd April
|
Create ‘Part 3’ geometry
|
4th April – 8th April
|
Create ‘Part 3’ layout
|
|
9th April – 15th April
|
Block out ‘Part 3’ animation
|
|
16th April – 28th April
|
Smooth out ‘Part 3’ animation
|
|
29th April – 1st May
|
Set up cameras for ‘Part 3’ animation
|
|
2nd May
|
Set up lighting for ‘Part 3’ animation
|
|
3rd May
|
Export ‘Part 3’ animation as PNG Image Sequence
|
|
Post-Production
|
2nd May – 10th May
|
Edit video together in Sony Vegas
|
11th May – 13th May
|
Add sound to project in Sony Vegas
|
|
EXTRA TIME
|
14th May – 23rd May
|
Sunday, 19 January 2014
Stages of Animation
Pre-Production
Script
The script is for getting the story across in a physical form, and is vital for the other stages of the animation. The script not only includes the dialog, but also the settings, actions and camera movements. Even though my animation isn't very story-based, it's still important to write down what happens so that it's easy to time the storyboard.


Storyboard
The
storyboard is made up of drawings in the form of a comic strip, and is used to
both help visualise the animation and to communicate ideas clearly. It details
the scene and changes in the animation, usually accompanied by text notes
describing things happening within the scene itself, such as camera movements.

The
storyboard will be useful as a visual reminder of the original plan; something
that can be referred back to throughout the production.
Production
Layout
Using low-resolution models and basic blocks of geometry,
the shots are composed and a rough animation is created. It’s essentially a 3D
version of the storyboard. This gives a
good idea of camera movements, depth of field and the posing of the models.


Character Animation
I plan to animate the characters body, his face, and any
props (such as blocks that he trips over). I will split the animation into two
key parts: blocking out, and smoothing.
Blocking out the animation involves creating all of the key
poses for the character and props. Key poses are the “key” moments that most
clearly describe the important physical actions or emotional moments in a
scene. They are so essential to the movement/acting that if you removed any one
of them, the scene would no longer work.


Lighting
Lighters have a broad range of
responsibilities, including placing lights, defining light properties, defining
how light interacts with different types of materials, how the position and
intensity of lights affect mood and believably, as well as colour theory and
harmony.
As
lighting isn't my main focus, I plan to do a very simplified version of this,
sticking to placing lights and deciding how they should affect the mood and believably.
Post-Production
Video Editing & Sound
FX
Video editing involves taking all of the rendered shots and
putting them together into one file, adding transitions between shots, and
making sure the timings all seem correct.
Sound FX involves selecting and assembling the sound
recordings, overlaying them with the video in Sony Vegas, and making sure any
lip syncing (for gasps, exclamations) is lined up.


Wednesday, 15 January 2014
Back to Work
I forgot to mention earlier, but the meeting with the Ipswich Museum was postponed until the 13th of January. I have now given my presentation, and can start focusing on the dissertation project again.
My main focus right now should be writing up a new, more specific timeline for the rest of the year, so that work is easier to manage.
My main focus right now should be writing up a new, more specific timeline for the rest of the year, so that work is easier to manage.
Wednesday, 18 December 2013
Slow Progress until 7th January
Lately I haven't been posting many updates on my dissertation, and I'd like to address the reasons. I have been focusing a lot of my attention on the Design Masterclass module, creating a presentation and game design document for the Ipswich Museum. The reason I've decided to prioritise this is because I have to give my presentation on the 7th of January, just under 3 weeks from now.
I feel that I can keep on top of my dissertation quite easily, but that I have to shift the timeline back slightly. Work will be very slow until this is over, but after the 7th of January, I will hopefully be able to give a lot of attention to the dissertation.
I also think that my presentation for the dissertation module on the 20th of January will be quite underwhelming, and that a lot of the contents are already available on this blog; I still,however, plan to make one or two more test animations and a storyboard to show off.
I feel that I can keep on top of my dissertation quite easily, but that I have to shift the timeline back slightly. Work will be very slow until this is over, but after the 7th of January, I will hopefully be able to give a lot of attention to the dissertation.
I also think that my presentation for the dissertation module on the 20th of January will be quite underwhelming, and that a lot of the contents are already available on this blog; I still,however, plan to make one or two more test animations and a storyboard to show off.
Tuesday, 3 December 2013
Jaunty Walk Cycle in Maya
Using what I've learnt in The Animator's Survival Guide, as well as my knowledge of graph editors and general animation in Maya, I've created a short walk cycle using the Max rig. I decided to make a cartoony walk cycle, so that I can give an example of 'expressive' movement, flinging his limbs all around him.
Although I'm happy with the result, I feel that some areas could use improvement, such as the arc of the arms.
Although I'm happy with the result, I feel that some areas could use improvement, such as the arc of the arms.
Wednesday, 27 November 2013
T.A.S.K. by R. Williams - Part 2: Character Movement
Pages 102 - 166 'Walks'
 First we'll make the 2 contact positions. In a normal, conventional walk, the arms are always opposite to the legs to give balance and thrust.
 Then we put in the passing position and because the leg is straight upon the passing position, it will lift the pelvis, body and head slightly higher.
 Next comes the down position, where the bent leg takes the weight. In a normal walk, the widest arm swing is on the down position.
 Next comes the down position, where the bent leg takes the weight. In a normal walk, the widest arm swing is on the down position.
 It becomes more clear when spread out and exaggerated.
Set The Tempo
The first thing to do in a walk is set a beat. Generally, people walk on 12's - march time (half a second per step, two steps per second.)
Lazy animators don't like to do it on 12's, as it's hard to divide up; instead, do it on thirds.
Have the character walk on 16's or 8's, as they are easy to divide up.

We set a beat:
4 frames = A very fast run (6 steps per second)
6 frames = A run or very fast walk (4 steps per second)
8 frames = Slow run or 'cartoon' walk (3 steps a second)
12 frames = Brisk, business-like walk (2 steps a second)
16 frames = Strolling walk - more leaisurely (2/3 of a second per step)
20 frames = Elderly or tired person (almost a second per step)
24 frames = Slow step (one step per second)
32 frames = ...'Show me the way... To go home'...
The best way to time a walk (or anything else) is to act it out yourself and time it with a stepwatch.
The Passing Position or Breakdown
There's a simple way to build a walk. Start with just 3 drawings. Our two contact positions, and then put in a passing position.
 This time it's raised higher than before, making it the 'up position', and the contacts will act as the low.
 When we make the character go down on the passing position, it becomes a 'cartoony' walk, the passing position acting as the low and the contacts as the highs.
The crucial thing is the middle position and where we put it. Changing the middle position can give the walk a whole new feeling.

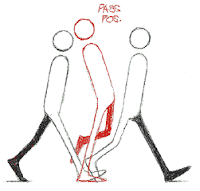
We don't have to stick to the same shape, there are things that can be done by changing mass.
 How about a heavier man with a pot on him: instead of raising the whole body on the pass position, we can stretch it, giving flexibility.
 Or conversely, squash it, giving more flexibility within the walk. Keep the pelvis level throughout.

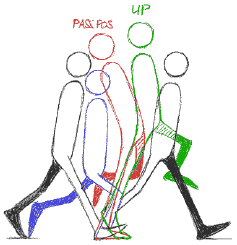

A walk is the first thing to learn. Learn walks of all kinds, because walks are the toughest things to do correctly.
Walking is a process of falling over and catching yourself just in time. We're going through a series of controlled falls.
Usually we lift off the ground just the bare minimum, which is why it's easy for us to stub our toes or trip over.
All walks are different, no two people in the world walk the same. Everyone's walk is as individual and distinctive as their face, and one tiny detail will alter everything.
Women mostly walk with their legs close together, resulting in not much up and down action on the head and body.
Men walk with their legs apart so there's a lot of up and down action with each stride.
Getting The Weight
It's the up and down position of your masses that gives the feeling of weight.
It's the down position where the legs are bent and the body mass is down where we feel the weight.
This is what happens in a so-called 'normal' walk:


Set The Tempo
The first thing to do in a walk is set a beat. Generally, people walk on 12's - march time (half a second per step, two steps per second.)
Lazy animators don't like to do it on 12's, as it's hard to divide up; instead, do it on thirds.
Have the character walk on 16's or 8's, as they are easy to divide up.

We set a beat:
4 frames = A very fast run (6 steps per second)
6 frames = A run or very fast walk (4 steps per second)
8 frames = Slow run or 'cartoon' walk (3 steps a second)
12 frames = Brisk, business-like walk (2 steps a second)
16 frames = Strolling walk - more leaisurely (2/3 of a second per step)
20 frames = Elderly or tired person (almost a second per step)
24 frames = Slow step (one step per second)
32 frames = ...'Show me the way... To go home'...
The best way to time a walk (or anything else) is to act it out yourself and time it with a stepwatch.
The Passing Position or Breakdown
There's a simple way to build a walk. Start with just 3 drawings. Our two contact positions, and then put in a passing position.


The crucial thing is the middle position and where we put it. Changing the middle position can give the walk a whole new feeling.


We don't have to stick to the same shape, there are things that can be done by changing mass.


We can also keep on breaking things down into weird places, provided we allow enough screen time to accomodate the movement. Changing what happens on the inbetween positions can make the walk very different. You could make the character go down to take the weight, whilst still going higher on the push off.
Putting the down where the up would normally be and bending the leg, then where the down position was, put a straight inbetween but delay the leg for balance. This gives an interesting walk.


The Double Bounce
The double bounce walk shows energetic optimism - the North American 'can do' attitude.
The idea is 2 bounces per step, you go down (or up) twice instead of once each step.

The pass position is down instead of straight, so the character bobs up and down as he goes.

Weight Shift
The weight shifts from one foot to another in a normal stride. Each time we raise a foot it thrusts the weight of our body forward and to the other food.

The shoulders mostly oppose the hips and buttocks.
For fatter, more 'cartoony' characters, you can exaggerate the weight shifting.

The Belt Line
Tilt the belt line back and forth favouring the leg that is lowest.

Normally the belt line is down with the foot that is down, and up with the food that is up.

Also, the shoulder normally opposes the pelvis, but we can do what we like.
Pages 167 - 175 'Sneaks'
There are 3 definite catergories of sneaks:

The traditional sneak has an average of 24 frames for each step, and a fast version is 16 frames per step, with a slow version being 32 frames per step.
The three main things are:

- The body goes back and forth, the body goes back when the foot goes up. The arms are used for balance.
- When the foot reaches and contacts the ground, the body is still back and the head is held back, delayed just a bit.
- After the foot contacts the ground, the body follows - going forward as the foot takes the weight. Next, the body will go back as the other foot goes forward.
For a slow sneak, the arms don't oppose the legs, they just balance (generally little action happens in the arms and hands).
It's a good example of counteraction. As he moves along, the head goes forward and the hands go back.
Pages 176 - 216 - 'Runs and Jumps and Skips'
In a walk one foot is always on the ground, and only one foot leaves the ground at a time.

In a run, both feet are off the ground at some point for 1, 2 or 3 positions.
You only have to lift both feet off the ground for one pose to make it into a run.
The same thing can be done with more 'cartoon' proportions, with the feet off the ground for 2 positions, plus violent arm swings.

There is also the 'real' version of the same walk, with reduced arm action, hardly any up and down on the body, plus both feet are off the ground for 2 frames.


With walks, we can curve the body. Reverse it on the opposite step and keep it straight on the pass position.
We can't do as much as with walks, as we don't have as many positions because of the run is faster.

In a fast run #5 should not be exactly the same silhouette as it's counter, #1. Vary it, make it higher or lower. The positions should also overlap slightly to help carry the eye.

In reality the faster the figure runs, the more it leans forward.
We can take things much further with animation, leaning the body all the way forwards.

It's a good idea to vary the silhouettes on a fast run, so that the eye doesn't read it as just the same one leg and one arm going around.

Subscribe to:
Posts (Atom)