Tuesday 29 April 2014

Finished topology

After following the advice I talked about in my last blog post, I've now made all of the changes to my character topology and I'm now ready to rig the model. I'm running almost a week behind schedule, but as long as I can get the rigging done fairly swiftly, I should still get everything finished in time.


New Limbs

The new elbow and knee joints were made using the first example on the below image by Ben Mathis.


The elbow joint is small so that it fits between the upper arm and forearm, but should still bend smoothly. If I find that it's too small and causes problems after being rigged, I can deform the arm a little to make it work properly.


The knees are made in the same way, but are wider and shaped to look like real knees. Once again though, they can be changed if the bending distorts them.
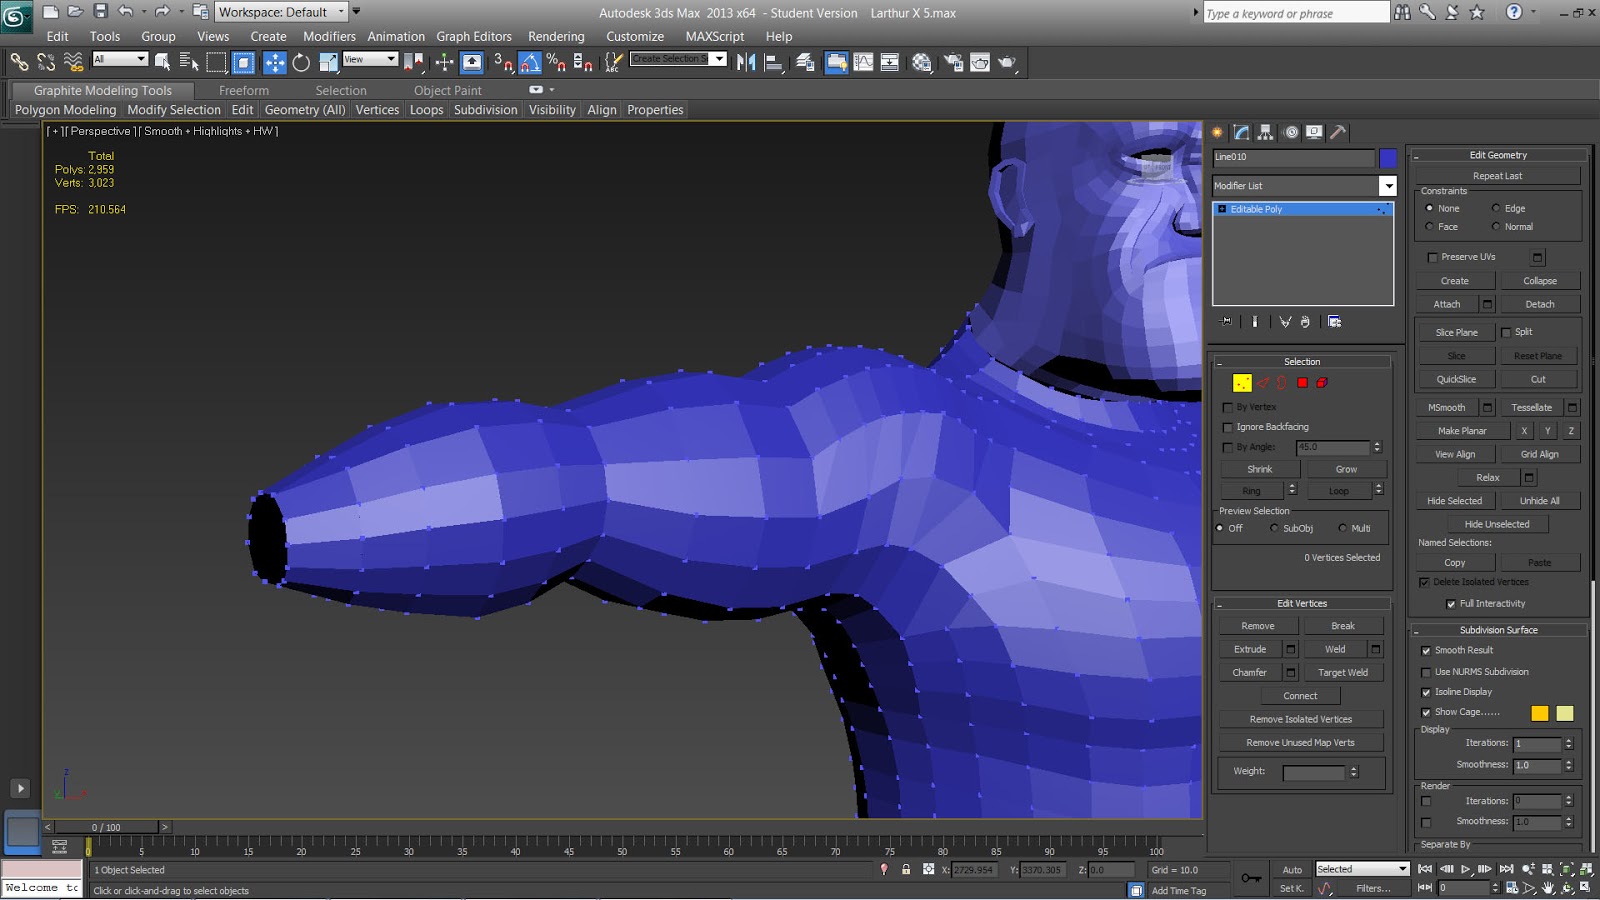


New Shoulder

I tried new, complex geometry for the shoulder, but found that I'd left it too late; every time I tried re-creating the chest, I couldn't make it fit correctly. Instead, I decided to go for the more simplistic cylindrical method (or bendy-straw method), and tidied up the chest so that it fits.

As for the stomach and pelvis, I felt that they didn't need to be changed in order to move correctly.
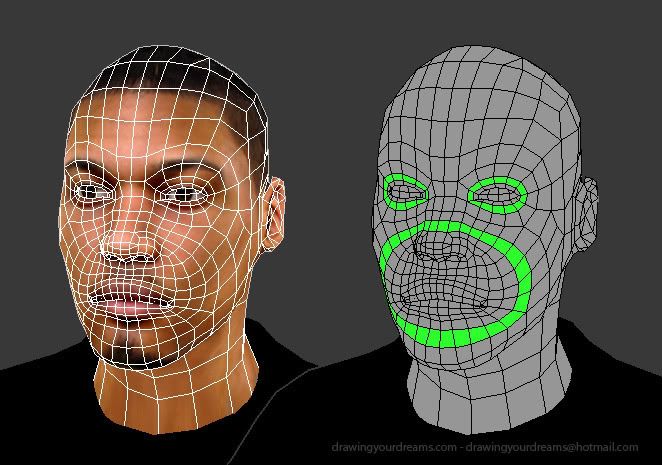


New Face

The face had the biggest re-haul in topology and took me a few hours to get it how I wanted it. The main changes revolve around the eyes, as they now have smooth rings of polygons going around them. I've also tried to limit the amount of triangles used so that any deformation works well. Unfortunately I had to lose some detail in the upper nose, but I don't feel that it's too noticeable.

Saturday 26 April 2014

Researching how to improve my topology

Now that I have my basic model finished, and before I rig it, I need to make sure that it's ready for the deformation that will happen when it's animated; this is absolutely crucial for any usable model within games or animations.

The Polycount Wiki is the site which is most referred to online, as it offers a great variety of tutorials and advice from both professionals and hobbyists. Specifically, the posts about topology for limbs, faces, shoulders and the general body are useful to me.

I don't feel I have the time to spend too long correcting the topology of my model, as my focus is mainly on the character animations, but I will at least get the crucial features for rigging finished. In hindsight, I should have done more research into these individual areas of topology before I started modelling my character, but it still shouldn't slow down my production timeline too much.


Limb Topology

The page on limb topology is the most important to me, as the arms and legs of my character have to move fluidly to make the animations look professional.

Firstly, the joints at the knees and elbows should be modelled so that they can easily collapse when bent, and look natural doing so. With the current limb topology on my mesh, the joints would become distorted when bent.


Secondly, the weights on the joints whilst skinning should be similar to the diagram below. The top bone shouldn't have 100% control over the top vertices, as that would create jagged, unnatural movement; instead, there should be a little bit of leeway for the bottom bone.


Shoulder Topology

For me, the second most important topology to correct on my model is the shoulder. After reading all of the posts from the Polycount Wiki, it's clear that the way I've done my shoulder won't work perfectly when I rig my model. I will try using the more complicated method of shoulder topology which is shown below, but if I find it's taking too long I will try the 'deformed cylinder' method.

In his video on shoulder topology, Jonathan Williamson runs through all of the loops that should go around a shoulder model. A lot of them follow the anatomy of muscles in a real shoulder, which creates a more realistic effect when moved around during animation.


On the diagram below, the first model has topology which has good muscle formation, but is harder to unwrap and doesn't bend as well. The bottom model shows the deformed-cylinder topology which is easy to weight and unwrap, but doesn't look as anatomically correct.


Body Topology

I am fairly happy with the correct topology of my characters body, but it will need adjusting to fit in the new shoulder topology, so it makes sense to make any vital corrections where I can.

Because the shoulder and chest have to fit together perfectly, I decided to watch the other video by Jonathan Williamson which talks about all of the loops on the chest. Although the diagram below makes it look complicated, the topology for the chest is all logical, and it already looks similar to my own character.


As you can see from the image below, the body topology can be done in a variety of different ways, and the model from Spy Hunter uses very simple top logy on the chest and legs. In a similar way to the shoulder, if I don't have the time to create complicated topology for the chest, it should work fine as it is.


Face Topology

For me, the facial topology of my model is the least important aspect to correct, as I may not have time to implement facial rigging and animation.

For advice on facial topology I followed an informative forum post by a user named Del. In a similar way to the video on shoulder anatomy, Del explains all of the different loops he uses on faces and why they're so important. I found that my character already has a lot of these loops, but for better facial animation I could still try improving it.


For more examples of cartoony facial topology, I found that Pinterest has a huge amount of user-created images that I can use as reference. Although a lot of them are for animations where the poly-count doesn't matter as much, there are also images which provide extremely useful insight into game character creation. I may consider uploading my own work once the dissertation is completed.


Wednesday 23 April 2014

Texturing - Part 2

The head was originally split up into three separate pelts: The face, the back of the head, and the hair. Once I had all of these sections flattened, I carefully welded them together along the seams to create one seamless UV map. I decided to split the ear and mouth-interior off into their own pelts, as they needed their own space.

You might also note that the head UVs overlap the top of the foot on the left, but this was easily amended by moving the foot UVs into another vacant space.


I started the head texture with basic block colours for the hair and skin, and then gave them cartoony shadows where they meet.


I then added more detail to the skin, making it more blue around the chin/neck and more red towards the forehead. I then added splotches of red to indicate areas with more blood-flow, such as the noose and cheeks. I also added some basic detail to the hair and beard, which I may alter in the future with more definition.


I gave the ear some basic shading to indicate the shape better, and also connected the bottom of the neck and torso by adding a collar with shading.


The eyes were made using a sphere with the back cut off (to save on poly count). After positioning them in place, it became very obvious that a perfect sphere wouldn't fit in his oddly-proportioned head. To get around this problem, I enclosed the eye in an FFD Binding object and then used that to morph the shape of the eye. The advantage of doing this instead of morphing the mesh itself, is that you can still rotate the eye around and keep the correct shape.


The mouth and tongue UVs are highlighted on the right hand side. I didn't put too much detail into these, as they aren't going to be seen a lot. I might go back and add a few more details if I have time in the future.


After finishing the main texturing, I applied a plain white material to all of the objects in the scene, created a skylight, and rendered an ambient occlusion map for the character. This means that even if I'm using a low-poly version, there will still be some smooth lighting on him.


In Photoshop, I overlaid the AO map on top of my texture and then blended it in using Multiply.


Saturday 12 April 2014

Texturing - Part 1

To UV Map the chest I used pelt mapping to lay out each half (front and back) of the chest and lay them next to eachother.


Using Photoshop I created a simple map which has a collar, a slight shadow on the belt (where his belly ends) and sweat patches under his arms.


I did the legs in a similar way, pelt mapping the front and back to lay them flat.


Unlike the chest, I decided to then stitch them together in the middle and adjust the map accordingly, to make the texture seamless.


After creating the texture in Photoshop, I had to merge it with the chest texture by re-scaling the UVs to fit in underneath.


The hand is split up into sections for the top and bottoms of each finger, as well as the top and bottom of the base hand, and then pelt mapped to flatten the UVs.


Although I plan to come back and add more detail later (mainly to the palm of the hand), I made some basic indications such as fingernails and creases on the tops and bottom.


Tuesday 8 April 2014

Modelling - Part 6

In order to create the hand, I decided to follow a separate online tutorial as I felt that the method used in the Digital Tutors class had too many polygons for what I wanted.

The tutorial I followed goes through the process step-by-step, and shows a simple way to create human hands. Although I followed it fairly closely, I did have to make changes to the proportions of the fingers as I'm dealing with a cartoon character.


The first step involved creating a cube and then dividing it into sections for the fingers and thumb. I decided to give my character 3 fingers instead of 4, as a lot of my favourite cartoons feature characters with only 3 fingers.


Connecting the hand to the forearm involved converting quads to triangles on the arm, and then re-shaping the wrist to fit in.


By turning on Subdivision Surfaces on each part of the model, I can get a better idea of what the finalised version will look like, and where I need to add more detail.


I decided to add hairstyle that was in the original design, as it seemed the easiest and most fitting for the character. To make the base of the hair I used the extrude tool on pre-existing faces, and then cut out and re-shaped the top of it. I also moved the vertices on the hairline around to make the edge loop around smoothly.

Friday 4 April 2014

Modelling - Part 5

I finished his back in a similar way to the chest, though I made sure to give him more refined shoulder blades.


For the legs I used the spline line tool to draw out his leg shape from both the front and side views, positioning them afterwards to make it look right.


Working up the leg and to the hips, I had to use the 'Relax' tool in the Paint Deformation box a lot. Lining the hips up with the bottom of the stomach perfectly was the hardest part, but the 'Snap' tool helped a lot.


I made his buttocks using the same method I used for the front, though I had to define a crack in the middle.


I may need to go back and re-shape the legs in the future to make them fatter, but I will see how they look when the first version of the model is completed.


I tried to avoid using too many faces on the feet, as I didn't want to over-complicate the topology there.


Connecting the legs to the boots involved transforming some quads to triangles, whilst still keeping the shape of the leg consistent.


The forearm was done exactly the same way as the upper arm, by drawing lines on the front view and bridging them together.


Tuesday 1 April 2014

Modelling - Part 4

I created an area inside his mouth to put teeth and a tongue, so that facial animation would look better.


The teeth were made out of a simple tube shape and then given small details. As the teeth won't be seen much, any important details can be done on the texture.


I placed the teeth in his mouth and mirrored them, positioning the bottom row to give him a fairly big under-bite.


As with the teeth, the tongue is low-detail as it won't be seen an awful lot. It still has enough edges along it to make it bendable.


I placed the tongue so that it rests upon the bottom of his mouth, as it would in real life.


Starting on the body of the character, I used the line tool to draw out his side-profile, and then extruded and adjusted it as an editable poly.


I did the same thing with his front-profile, creating the basics of the final model.


Working from the bottom, I bridged between the two outlines and positioned the new segments along his stomach and side.


Although I forgot to take screenshots for a lot of the process, I created the arm in a similar fashion and started connecting them up.


After researching humanoid models online and how to do muscle sculptures, I decided to re-do the topology on his front to make room for slight muscle definition.